Automated visual testing has gained popularity recently in the test automation community. Thanks to tools like Applitools and Test Automation University! But visual testing using images is not new. It has always been one of the quickest ways to identify issues in the GUI. Instead of writing code to validate the individual elements in a web page explicitly, the automated tools help in comparing the expected UI design with the actual page. It would report if there are any differences.
What is aShot?
aShot is a WebDriver screenshot utility. It has been around for a while and widely used. It is the preferred choice of Selenium users for capturing full-page screenshots for years. Many automation engineers might be using aShot to capture screenshots to send them to tools like Applitools.
But do you know that it can perform visual testing on its own? Yes! It can compare images, and highlight the differences.
How can it help?
aShot’s takeScreenshot() method returns a screenshot object which contains the image and data for comparison. You can use ImageDiffer to compare the two images and report the differences. Take screenshots of your base (expected design) and the test page as you would normally do.
//Take Screenshots
Screenshot screenshot = new AShot()
    .shootingStrategy(ShootingStrategies.viewportPasting(1000))
    .takeScreenshot(driver);
ImageIO.write(screenshot.getImage(), "PNG", new File("./img/" + driver.getTitle() + ".png"));
Once the screenprints are ready, you can simply compare the existing images. Even better, compare the new screenprints taken in runtime with the already saved images. Users can assert for reported differences and also save a resulting image highlighting the differences.
//Compare Base vs. Test Screenshots
BufferedImage expectedImage = ImageIO.read(new File("./img/base.png"));
BufferedImage actualImage = ImageIO.read(new File("./img/test.png"));
ImageDiffer imageDiffer = new ImageDiffer();
ImageDiff imageDiff = imageDiffer.makeDiff(expectedImage, actualImage);
ImageIO.write(imageDiff.getMarkedImage(), "PNG", new File("./img/aShot_Result.png"));
Assert.assertFalse("Visual differences found!", imageDiff.hasDiff());
Here is an example of base and test images –
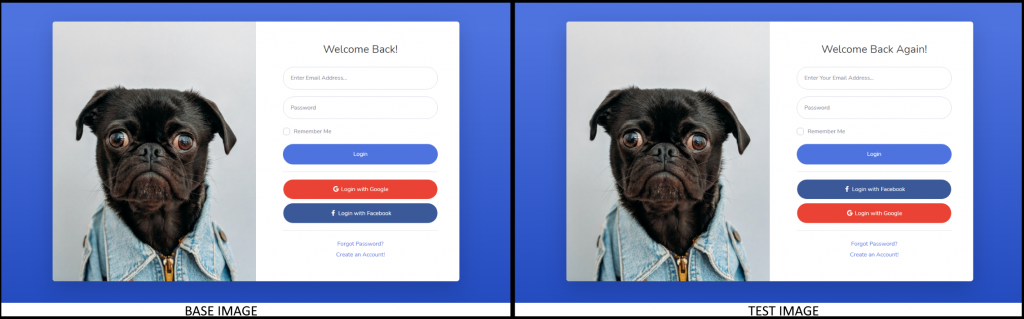
And using the simple few lines of code listed above, here is the resulting marked image.
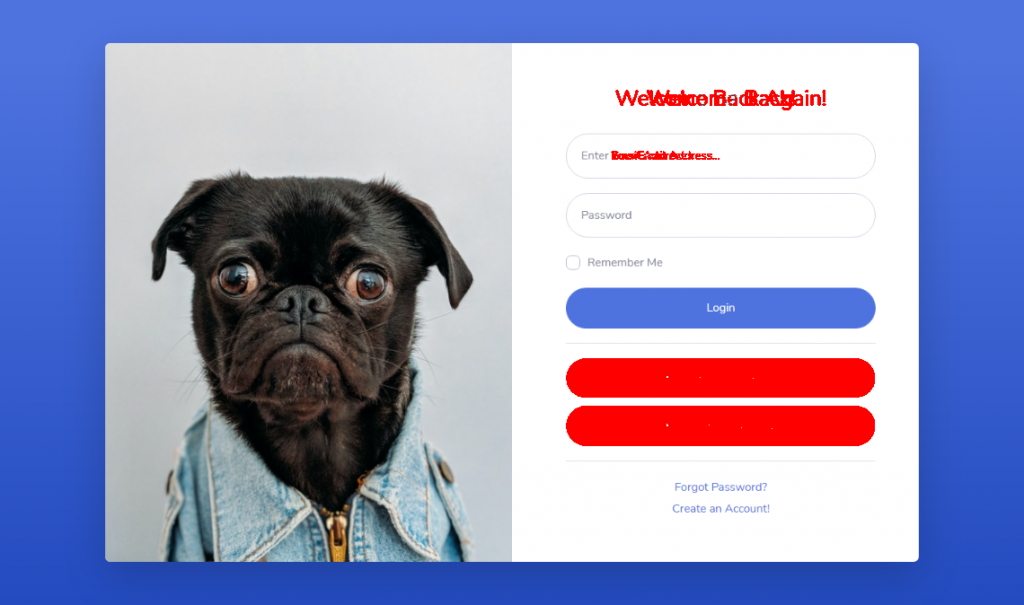
While it had highlighted differences, at first look you might not be happy with the way it had marked the differences. But it does the job, tells you what and where the differences are. Let’s look at the pros and cons of using aShot for visual testing.
Benefits of using aShot for visual testing
- Free, Open-Source and Simple to use
- It is already a part of most WebDriver automation frameworks for screenshot capture, hence it can be easily extended for image comparison as well.
- Use aShot’s inbuilt capabilities to capture independent elements for better comparison rather than the whole page.
- Quickly identify if there are any visible differences.
It doesn’t have the AI capabilites, ignore regions or self-heal that the other tools can boast, but it a very handy tool if you would like to do a quick comparison and check automatically if there are any differences.
You can leave your comments here or on Twitter @testingchief. If you are interested in similar articles on software testing or test automation, you can find them here.